www.beezar.com

 |
Background -
As many of you know, the Millett MOSFET-MAX continues the long tradition of the Millett in using bypass film caps. Under certain scenarios, a small bypass cap applied in parallel across a large electrolytic can cure the issues of using an electrolytic in the signal path: high end harshness and lack of resolution. High end harshness and lack of resolution occurs in almost all electrolytics to a greater or lesser extent. More so in "power" caps versus "boutique" caps, but to a certain extent in both.The basic Millett, and also the MOSFET-MAX, uses Wima film caps as bypasses. These work |
||
|
very well and constitute the basic BOM and economical choice of one or two "Can't Miss MAX Builds" in the revised Tweaks-Boutique section. Using the Wimas as bypasses can make the MOSFET-MAX a compelling amp with just power caps in the signal positions. They also help the sound of many of the boutique caps and pair very well with the Nichicon ES's, for instance, a favorite electrolytic cap for the signal positions on the MOSFET-MAX (CA2 and CA7). Pairing the Wimas with the ES's (or Nichicon Muse KZ's if case height is not an issue) is another of the "Can't Miss MOSFET-MAX Builds." However, the Wimas cannot remove a certain edge and graininess that is slightly noticeable to the committed audiophile. In those cases, higher quality bypassing caps are desired. At the same time, the BJT Diamond Buffers enable the MOSFET-MAX to have an extended frequency response performance that rivals many high-end amps. So, only the most linear and neutral caps should be used as bypasses, or the MAX's frequency response is noticeably damaged. For instance, while the Sonicaps on the output provide a spectacular high frequency response and buttery mids, the MOSFET-MAX's often intimidating bass is noticeably curtailed. In the cathode bypass positions by the tubes, such a cap can actually wreck the MOSFET-MAX's performance. | |||
| Vitamin Q paper-in-oil (PIO) caps have always been the preferred choice in the case of an upgraded MOSFET-MAX. You should note that the MOSFET-MAX's designer, Colin Toole, uses the Vitamin Q's on his MOSFET-MAX (along with the Black Gate NX caps in the signal positions). However, the genuine name-brand Sprague Vitamin Q's are much larger than the positions provided on the board. However, Colin provided the board with several pseudo-test point holes for other similar PIO caps. Since they often have connecting nipples on the ends of the cap, they can be upended in a "tombstone" position. This is how Colin mounted his smaller Vitamin Q's in the forward positions (CA8). This is also possible in the rear positions by the tubes (CA9), by tombstoning in one of the extra Gnd test point holes, and running a flexible lead over to one of the positive (+) pads in the CA9 positions. |
 | ||
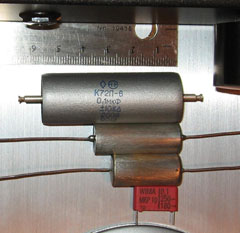 |
At left is a photo showing the commonly available relative sizes of many of these type of preferred capacitors. At top to bottom, starting with the top - 1. Russian K72 Teflon 2. Hopkins Vitamin Q (same size as 0.22 Sprague) 3. Philco Vitamin Q (used in Colin's MAX) 4. WIMA MKP10, 0.1uf (used in the Millett Hybrid and the 1st MAX proto) Considering the actual MAX production board has horizontal room for something between the WIMA and the Off-brand VitQ, it's easy to see that using one of these very desireable caps presents some challenges. |
||
|
Russian K42Y-2 PIO Capacitors -
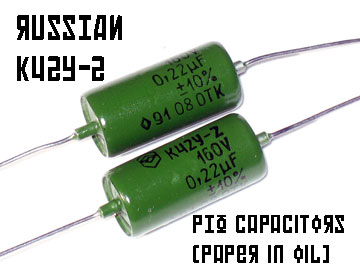
Enter Rob Wills, aka user "fordgtlover" on the Head-Fi forum. Rob discovered a type of PIO cap on e-bay (and elsewhere), readily available with an inexpensive price. The cap, as pictured above, is a Russian version of similar construction and performance close to a Vitamin Q. However, unlike most Vitamin Q's, the Russian K42Y-2 is less than 1" long at the desired 0.22uf rating (160V). After extensive testing between Rob and myself on several MAX builds, it is apparent that this cap provides an improvement over the Wima box caps for use on the MOSFET-MAX - neutral, with no loss whatsoever in the bass frequencies. They hava a tad bit more glare than a genuine 96- or 196-series Vitamin Q, but can compete head-to-head with other Vitamin Q - type film capacitors. |
|||
Tombstoning the Caps -
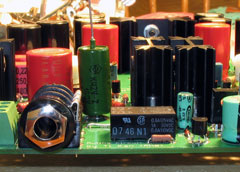
Tombstoning is a comon term used for mouning a Printed Circuit Board component opposite to accepted practice - standing up in a vertical position. This is done when the part is too long to fit in the horizontal position. In the case of many vintage PIO and Teflon cap, the MAX provides very large holes to contain the nipples or soldering knots where the leads are connected. This makes optimum use of available case clearance, allowing only the body of the part to rest above the board.The Russian K42Y-2 caps have such nipples. At right is an example of how the cap fits in the board without any preparation. It doesn't fit in the tombstoning holes and sits awkwardly above the board. So, the first step is to reduce the size of the nipple so that it will fit in the hole. |
 |
||
| Reducing the nipple slightly serves two purposes - fitting in the hole, but also removing the green paint so that good soldering contact is possible. You can use a file, sandpaper, or I take the easy way - a pair of small needle-nose pliers. I simply grab the nipple between the plier jaws and twist until the paint is rubbed off (no nasty comments, please!) and the joint with the lead is shiny. This is usually enough to let the cap slip in the hole with the bottom of the cap body flush against the board. | |||
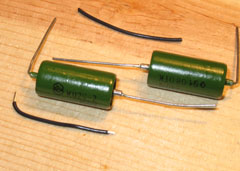 |
The next task is to solder a new flexible lead on the other end. As it happens, the existing lead is not long enough to bend over the top and down, and have enough length left to reach board level. Rather than solder on extensions as many of us normally do, it's probably better to just solder on a flexible wire lead. This simplifies much of the insulating requirements and may actually improve performance if you use the Navships-type (available on e-bay) silver-plated copper wire. Of course, the Navships wire also uses Teflon as the insulation, which also helps matters considerably. At left is shown a pic with the nipples reduced on one end, with the other leads bent and a corresponding length of the Navships hookup wire ready to tin and solder. |
||
Tin the wire leads -
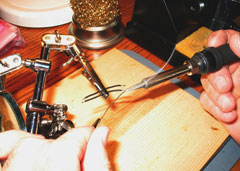
Fairly straightforward, tinning the leads on hookup wire or other components helps immensely when you are preparing to do the somewhat difficult task of soldering one lead to another. Only a litle bit is necessary. The stripped lead should be at least 1/8" or longer, to provide strength at the vulnerable and stressful connection close to the cap nipple. |
 |
||
 |
Solder the leads to the caps -
This is definitely a job for the helping hands tool. Clamp the cap and the tinned hookup wire so that the tinned, stripped portion lines up with the wire cap lead and is resting within the "knee" of the bent lead and the cap nipple. Solder along the length of stripped portion of the hookup wire, so that you have more than just a pin-point connection. You should have the entire ~1/8" length of the stripped wire portion soldered to the cap's wire lead - as close to the nipple as possible. This gives you maximum flexibility and maximum savings in clearance.
|
||
Ready for Heat Shrink -
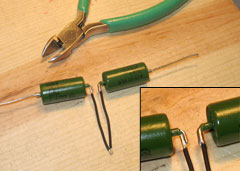
When your soldering is complete, clip the cap's wire lead as close to the solder joint as possible. Again, this allows maximum flexibility with the hookup wire lead and provides less of a burr to tear at the soft heat shrink. At right is a pic with an closeup view of the completed, soldered joints and ready for heat shrink. |
 |
||
 |
Heat Shrink the Soldered-Lead Joint -
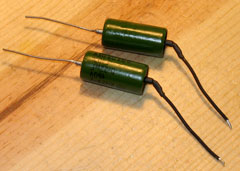
I use two layers of heat shrink here. One large short portion goes on first - try to have just enough length to cover the nipple and the soldered joint. This goes on first. After that, use a longer length that covers as far up to the nipple as you can, and goes some length beyond the first heat shrink down the insulation of the hookup wire. This may seem a little ridiculous in detail, but the first heat shrink piece will have a tendency to pull off the nipple due to the tremendous stress in the bend and any flexing that you might do. As a matter of fact, it helps in this instance to bend the lead back out to give you enough room to slide the heat shrink on the nipple.
|
||
|
The longer, second piece guarantees that the first one doesn't slide off. This is important because the bent-over lead joint will see a lot of stress and abrasion. An uninsulated lead is close enough to the bottom of the case lid to arc. So, the proper application of heat shrink is critical in this position. Further, even though with the body of the cap there will be plenty of clearance in the Hammond case (see below), the bent-over lead becomes the high point on the board. Any time you work on the board in the future and turn the board over for any reason, it will now rest on these soldered lead joints of the caps. So, take a little bit of care to protect these joints. |
|||
Ready to Go! -
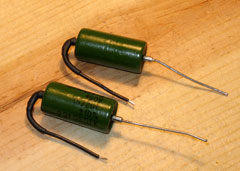
Here you see the completed caps ready to solder in place!
|
 |
||
 |
Soldering into the MOSFET-MAX Board -
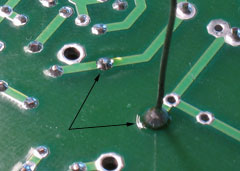
With the extended nipple and the size of the pseudo-test-point hole, the final joint will be similar to the size of one of the heat sink pins. So, be careful, apply heat all around and make sure the solder covers the joint between the lead and the nipple. Don't fret if you see the solder disappear in the cap's nipple. Just re-apply more solder until the opening is covered. |
||
| Our fabricated hookup wire lead is straightforward, of course. However, be sure to turn the board over and check to see that you've got the cap lined up reasonably well. There's quite a variance in some of these caps - perhaps differing in length by as much as 1/16" - 1/8", but not enough to matter. Just line them up, make them flush to the board and as stable as possible to prevent potential problems in the future.
|
|||
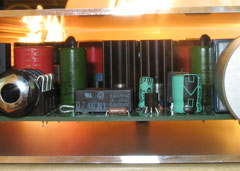
| Here's the completed cap installation with the board placed in the 3rd slot from the bottom in the recommended Hammond enclosure. It illustrates that ample clearance is available, even if you aren't precise with your caps, leads, and how flush you mount them to the boards. So, the Russian K42Y-2 caps provide plenty of variance in how perfectly they're mounted, but with room to spare. You will notice upon immediate listening that there is no loss in bass with these caps whatsoever. The highs improve on run-in, taking perhaps a few hours to a partial day to start sounding very extended with lots of high-end detail. They are smooth from the very start. |
 |
||
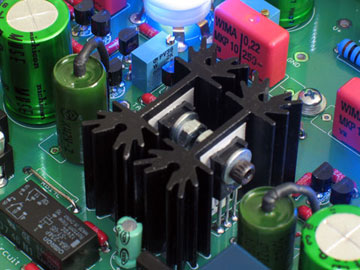 |
Here is a final, close-up look at the caps mounted in their tombstoned positions, flush against the board, with only a slight bend of heat-shrunk lead above the top of the heat sinks. Thanks to Rob Wills for making this excellent discovery and stay tuned - you'll be seeing more of these caps in the future. |
Finally, please make sure to review the important changes on the "Boutique" section of the MOSFET-MAX website. As time goes on, we are finding new discoveries like these, but also learning some that don't work - even though we thought they should. |
|
